Before you begin Project 1:
- If you are a beginner make sure you go through steps 1- 10 of the Dreamweaver CS3 Tutorial (Find out in previous posts) before attempting this project.
- Download Tutorial Files ( DWCS3_TABLE Template.rar (293 KB)-- If you are unable to download this means you need to follow me first and after that you have to send me a request mail after that i will approve you.)
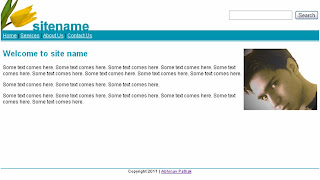
 ( Template Preview )
 - After downloading the files make a copy of the 'images' folder in another folder entitled 'project'.
- Define a new Dreamweaver site for the 'project' folder. You can also define another for the original downloaded folder. You can use this to compare and analyze in case something goes wrong or you are confused about how to do something.
Begin Tutorial:
Dreamweaver Template
- Create a New HTML Template. Save it as template.dwt. It will get saved in a new "Templates" folder.
- Modify > Page Properties (Set Left/ Right/ Top/ Bottom margins = 0)
Table #1
- Insert > Table (with 2 columns > 1 row > 780 pixels > cell padding = 0 > cell spacing = 0)
- Select Table (right click in the table > Table > Select Table). In the Properties Panel set Align = Center.
- Click in the 1st cell > Insert Image > browse to images folder > selct logo.gif > type alt tag = logo.
- You can adjust the width of the 2 cells. Click inside the 2nd cell. In the properties panel set Align = right. You can add the code for a here if you like. For now you can add a form tag, form field and button [ Insert > Form. Then click inside the form outline that will display and Insert > / text field / button].
Table #2
- Click outside the table. Insert a table (1 row/ 1 column/ 780 pixels/ cell padding = 5/ spacing = 0 / border = 0)
- To set the background color of the table, in the properties panel, click on the box with the little triangle next to "Bg" and use the eyedropper to pick the yellow color from the flower.
- Click inside the table. Enter Menu text [Home | Service | About | Contact ]
Table #3
- Create another table. Select the table and align center. insert a transparent spacer image (1x1 pixel). The table will collapse to 1 pixel height. Since we want it to be white we won't put a background color. This will be a white line.
Table #4
- Create another table. Select the table and align center. Use th eyedropper to pick a green background color from the leaf in the logo image. Insert the spacer image. The table will collapse to 1 pixel height. It will be a green line.
Table #5
- Insert another table (cell padding = 5). Select table and align = center in properties panel.
Editable Region
- Insert > Template Objects > Editable Region > name it ‘content’
Table #6
- Insert another table. Give it a green background and insert the spacer image.
- Insert another table (cell space = 5 px)
- Click inside the table. Align = center in properties panel.
- Type in footer text (coyright 2011 Abhinav Pathak) and format it (size and color)
CSS Styles
- New CSS Rule> Tag = H1 > Select the green from the leaf and size = 20, and font = Arial, Helvetica, Sans-Serif and weight= bold
- New CSS Rule > Tag = body > Size = 12 and font = Arial, Helvetica, Sans-Serif
Save template
Page #1
- Create new html page [File > New > Page from Template > Project > template > Create]and name it "index.html".
- Insert the 2nd image and give it the alt tag 'mother and child'.
- Type in the textual content. Select the heading text and select 'Heading 1' from the 'Format' dropdown in the Properties Panel. This will style the heading as per the H1 css style create earlier.
- Click image. Set align = right in the properties panel.
- Type 'Home page' in the document title (at the top of the document window).
- Type in the keywords for the page [Insert > HTML > Head Tags > Keywords]
- Type in the description for the page [Insert > HTML > Head Tags > Description]
Pages #2, 3 and 4
- Make copies of the index.html file (from within the 'Files' panel - if not visible on the left go to Window > Files) and rename them to service.html, about.html and contact.html.
- Put the appropriate headings, content text, title, keyword and description tags, and images into these 3 new pages.
Link the Menu
- Now we must go into template.dwt and link the pages from the menu.
- Select the text "Home"
- Click on the folder icon next to the Link field in the properties panel.
- Browse to index.html and select it.
- You will see an underline appear below “Home” and it changes to a blue color.
- Click anywhere within “Home” and click the tag that is visible at the bottom of the document window.
- Give the color and font properties, notice the style name that is created as you will need to apply the same style to the other 3 menu items.
- Link and apply the same style to the other menu items.
- Save the template and the pages will be updated automatically.
- Right click on index.htm > Click preview in Browser > Select Internet Explorer or Firefox > View your site in the browser > check to see if all the links are working ok
Now your site is ready Congratulations!

No comments:
Post a Comment